
Using Selenium IDE to create Selenium RC Test:
- Recorded a Test Scenario using Selenium IDE
- Copied the Selenium RC code generated by the Selenium IDE
- Pasted the code into the Eclipse IDE
- Resolved few errors and warnings
- Run the Selenium RC test using JUnit in Eclipse IDE
But how not to use Selenium IDE and write Selenium RC Test on our own. In order to understand how to write Selenium RC Tests on our own, we've to start writing the code from Scratch.
Writing Selenium RC Tests on our own (i.e. without using Selenium IDE )
Please follow the below steps:
1. Create a Java Project named "Selenium143" in Eclipse IDE as shown below:

2. Configure the above created Project "Selenium143" to work with Selenium RC
Note - If you are not clear on how to create java projects in Eclipse IDE and configure such that they work with Selenium RC, please refer to Post#3 Configure Projects in Eclipse IDE to work with Selenium RC
Note - If you are not clear on how to create java projects in Eclipse IDE and configure such that they work with Selenium RC, please refer to Post#3 Configure Projects in Eclipse IDE to work with Selenium RC
3. Create a Package named "home_page" under the "Selenium143" project as shown below:

Note: If you don't know or remember How to create Packages?, please refer to Post#115 Packages
4. Create a Java Class named "OpenURL" under the "home_page" package as shown below:


5. Inside the "OpenURL" class, create a method named "openSelenium143" as shown below:

6. Specify the "openSelenium143" method with @Test annotation as shown below and ensure that an error is displayed:

7. In order to resolve this error, hover your mouse cursor on this error and select " Import Test (org.junit) " option as shown below:

8. Ensure that the import org.junit.Test; import statement got added and the error got resolved on import as shown below:

Note: We are importing a predefined class "Test" from "org.junit" package into our "Selenium143" Class. i.e. The functionality of the @Test annotation is predefined in Test Class as part of JUnit framework.
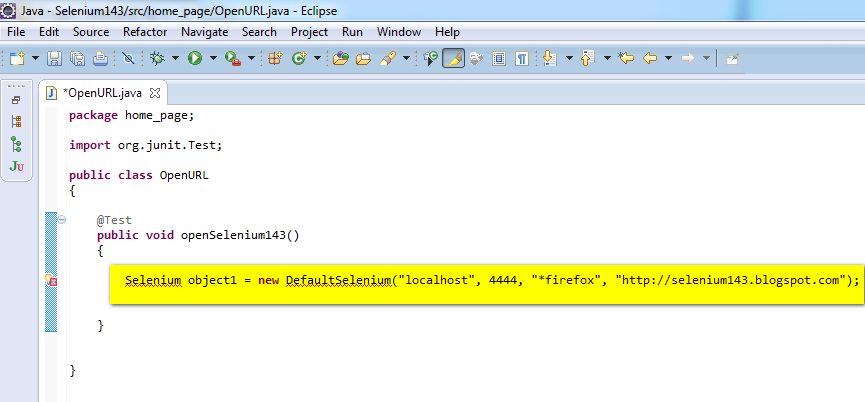
9. As we already know that Selenium RC server executes our Selenium RC tests on the specified browser, we've to create a Selenium object in our Selenium RC tests to communicate or connect with Selenium RC Server as shown below:

10. After looking at the above screenshot, its very clear that we have an error displayed on adding Selenium object creation statement. Hover your mouse cursor over this error message and select "Import Selenium (com.thoughtworks.selenium) " option as shown below to resolve the error:

Note: We are importing a predefined class "Selenium" from "com.thoughtworks.selenium" package into our "Selenium143" Class. i.e. We can now use the Selenium Class in our "Selenium143" Class for creating objects and performing operations on the created object.
11. Ensure that the Selenium error got resolved after adding the selected import statement as shown below:

12. But if you have observed correctly , we've one more error displayed for 'DefaultSelenium' in the above screenshot unresolved. Hover your mouse cover over this error and select "Import DefaultSelenium (com.thoughtworks.selenium) " option as shown below to resolve this error:

Note: We are importing a predefined class "DefaultSelenium" from "com.thoughtworks.selenium" package into our "Selenium143" Class. i.e. We can now use the DefaultSelenium Class functionality in our "Selenium143" Class.
13. Ensure that the selected import statement got added and also the error got resolved as shown below:

14. Before going to the next steps, lets understand the below statement:
Selenium object1 = new DefaultSelenium("localhost", 4444, "*firefox", "http://selenium143.blogspot.com");

6. Specify the "openSelenium143" method with @Test annotation as shown below and ensure that an error is displayed:

7. In order to resolve this error, hover your mouse cursor on this error and select " Import Test (org.junit) " option as shown below:

8. Ensure that the import org.junit.Test; import statement got added and the error got resolved on import as shown below:

Note: We are importing a predefined class "Test" from "org.junit" package into our "Selenium143" Class. i.e. The functionality of the @Test annotation is predefined in Test Class as part of JUnit framework.
9. As we already know that Selenium RC server executes our Selenium RC tests on the specified browser, we've to create a Selenium object in our Selenium RC tests to communicate or connect with Selenium RC Server as shown below:
10. After looking at the above screenshot, its very clear that we have an error displayed on adding Selenium object creation statement. Hover your mouse cursor over this error message and select "Import Selenium (com.thoughtworks.selenium) " option as shown below to resolve the error:

Note: We are importing a predefined class "Selenium" from "com.thoughtworks.selenium" package into our "Selenium143" Class. i.e. We can now use the Selenium Class in our "Selenium143" Class for creating objects and performing operations on the created object.
11. Ensure that the Selenium error got resolved after adding the selected import statement as shown below:

12. But if you have observed correctly , we've one more error displayed for 'DefaultSelenium' in the above screenshot unresolved. Hover your mouse cover over this error and select "Import DefaultSelenium (com.thoughtworks.selenium) " option as shown below to resolve this error:

Note: We are importing a predefined class "DefaultSelenium" from "com.thoughtworks.selenium" package into our "Selenium143" Class. i.e. We can now use the DefaultSelenium Class functionality in our "Selenium143" Class.
13. Ensure that the selected import statement got added and also the error got resolved as shown below:

14. Before going to the next steps, lets understand the below statement:
Selenium object1 = new DefaultSelenium("localhost", 4444, "*firefox", "http://selenium143.blogspot.com");
- Selenium is a predefined Class
- object1 is the object name I have given. In this example object1 is an object of Selenium Class.
- new is the java keyword used to create an object for the specified class (i.e. object1 object for Selenium class in this example)
- DefaultSelenium( ) is a predefined constructor calling statement. Please refer to Post#74 Constructors to know more about constructors
- localhost is the first parameter which gets passed to the DefaulSelenium( ) predefined constructor. This argument is specified as localhost as I'm going to run the Selenium RC test in the same system where I'm writing this code. If you want to run the written Selenium RC test on a different machine, you have to mention the IP Address of the machine on which you want to run this test.
- 4444 is the default communication TCP/IP protocol. If you have specified any other protocol say 8888 while starting the Selenium Standalone Server then you have to use 8888 instead of 4444, else if you have not specified any protocol to start the Selenium Standalone Server then you will be using 4444 as this is the default communication protocol. (i.e. If you don't provide any protocol while starting the Selenium Standalone Server, it will take the default protocol i.e. 4444)
- *firefox is the parameter which tells the Selenium Server which browser to use. As we have mentioned it as *firefox it will use Firefox browser to run the Selenium Test. For chrome and IE browsers we have to specify *googlechrome and *iexplore respectively.
- http://selenium143.blogspot.com is the last paramater, which specifies the base URL of the site we are testing.
We can also break the above single statement into two separate statements as shown below:
Selenium object1; // Declaring the object1 as an instance object of Selenium Class
object1 = new DefaultSelenium("localhost", 4444, "*firefox", "http://selenium143.blogspot.com"); // Assigning the reference to the object1 and calling the DefaultSelenium( ) constructor while the object is getting created.
15. Lets add few more statements inside the openSelenium143( ) method, which uses the 'object1' object created by the first statement to 1) starts the Selenium Server Driver in a new Firefox Browser session, 2) open the home page of the base URL specified in the first statement, 3) close the test application and 4) finally to close the Firefox Browser session.
16. First lets start the new Firefox Browser session. Type object1 followed by dot i.e '.' and wait for the selenium commands to appear as shown below:

17. While the selenium commands box is open, type 'st' letters and observe that the selenium commands got filtered to four commands from many commands as shown below:

18. Select 'start( )' command from the filtered commands as shown below:


18. Select 'start( )' command from the filtered commands as shown below:

19. Ensure that the selected command got added to the code and add a ';' to end the statement as shown below:


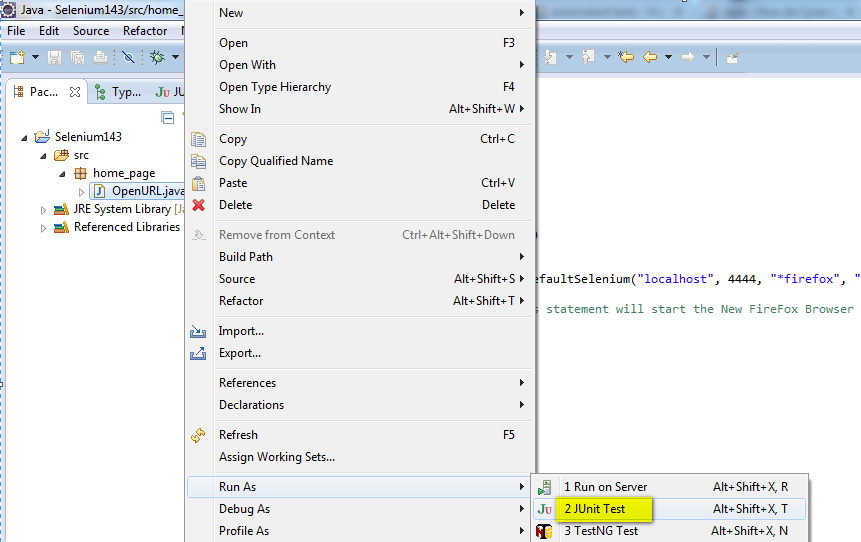
20. Save the Selenium RC Test and Run the Test using JUnit as shown below:

21. Ensure that the Test got failed as shown below as we've not started the Selenium Standalone Server as explained in Post# 4 Start the Selenium Standalone Server

22. Start the Selenium Standalone Server and Repeat the Step 20
23. Observe that the Firefox has started the Selenium Server driver as shown below and also observe that the Test got Passed :

24. As we've seen in the above steps that object1.start( ); selenium command has opened Selenium Server Driver which actually Runs the selenium Automation tests in a new Firefox Browser Session, now lets see the next command which opens the URL of our Application i.e. object1.open("http://www.selenium143.blogspot.com"); as shown below:

25. Save and Run the Test using JUnit and observe that the specified URL got opened in Firefox Browser as shown below:

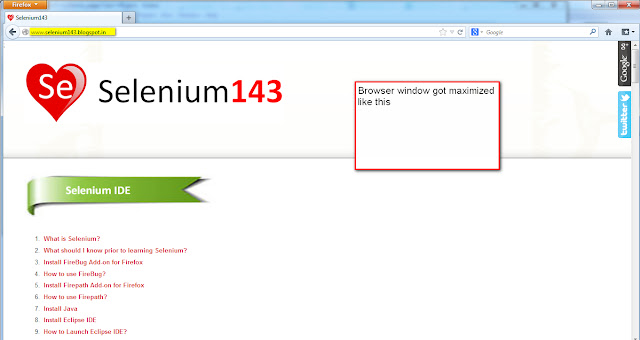
26. Lets write the next command object1.windowMaxmize( ); to maximize the opened Browser as shown below:

27. Save and Run the Test using JUnit and observe that the specified URL got opened in Firefox Browser and the Firefox Browser got maximized as shown below:
28. Lets write the next command object1.close( ); which closes the open Browser having our Application URL as shown below:

29. Save and Run the Test using JUnit and observe that the following Browser Window having the specified URL gets closed as shown below:

30. Lets write the next command object1.stop( ); to stop the Selenium Server Driver as shown below:

31. Save and Run the Test using JUnit and observe that the Firefox Browser Window which has Selenium Server Driver running gets closed as shown below:

32. As I explained the commands step by step, it will be more clear for you if you can watch the following video of what we have done till the previous step:
Click here to watch the video
32. The selenium commands explained in this post will be used in my next upcoming posts also. So please remember the above commands.
In this post we've only used @Test JUnit annotation. We can actually categories the Selenium Commands used in this post to fall under different JUnit annotations i.e. @Before @Test @After Annotations.
Implementing JUnit Annotations will be explained in the next post.

21. Ensure that the Test got failed as shown below as we've not started the Selenium Standalone Server as explained in Post# 4 Start the Selenium Standalone Server

22. Start the Selenium Standalone Server and Repeat the Step 20
23. Observe that the Firefox has started the Selenium Server driver as shown below and also observe that the Test got Passed :

24. As we've seen in the above steps that object1.start( ); selenium command has opened Selenium Server Driver which actually Runs the selenium Automation tests in a new Firefox Browser Session, now lets see the next command which opens the URL of our Application i.e. object1.open("http://www.selenium143.blogspot.com"); as shown below:

25. Save and Run the Test using JUnit and observe that the specified URL got opened in Firefox Browser as shown below:

26. Lets write the next command object1.windowMaxmize( ); to maximize the opened Browser as shown below:

27. Save and Run the Test using JUnit and observe that the specified URL got opened in Firefox Browser and the Firefox Browser got maximized as shown below:

28. Lets write the next command object1.close( ); which closes the open Browser having our Application URL as shown below:

29. Save and Run the Test using JUnit and observe that the following Browser Window having the specified URL gets closed as shown below:

30. Lets write the next command object1.stop( ); to stop the Selenium Server Driver as shown below:

31. Save and Run the Test using JUnit and observe that the Firefox Browser Window which has Selenium Server Driver running gets closed as shown below:

32. As I explained the commands step by step, it will be more clear for you if you can watch the following video of what we have done till the previous step:
Click here to watch the video
32. The selenium commands explained in this post will be used in my next upcoming posts also. So please remember the above commands.
In this post we've only used @Test JUnit annotation. We can actually categories the Selenium Commands used in this post to fall under different JUnit annotations i.e. @Before @Test @After Annotations.
Implementing JUnit Annotations will be explained in the next post.